Quality-Driven Production Drives Inspection and Measurement in M2M Communication

By Yasuo Watabe, Saki Corporation
Quality is more important than ever, as the electronics industry faces new technologies, market realities and the race toward the smart factory, with its Industry 4.0 and machine-to-machine (M2M) initiatives.
It is relatively easy for machines to connect, but it is the communication of real-time, valid and accurate data that is key to M2M communication. Absolute precision is required. With the introduction of Saki’s fifth generation 3D 3Di automated optical inspection (AOI) and 3D 3Si solder paste inspection (SPI) systems, Saki has developed its concept of “QUALITY DRIVEN Production,” or QDP, which is making true M2M communication a reality.
What is QDP?
QDP is a set of tools that ensures that the entire AOI/SPI processes are under control. QDP improves inspection process stability, maximizes line first-pass yield, minimizes operating and quality-related costs, and provides full traceability of the inspection process. QDP benefits the production environment by keeping product quality and the inspection process under control, while improving manufacturing processes.
The QDP concept combines three key factors: advanced hardware, advanced software and applied technology. Delivering highly accurate and repeatable image acquisition that results in absolute measurement is a requirement for inspection. In high-speed manufacturing, vibrations and machine operation can easily throw a system off kilter, move a component or change the coordinates. The slightest change alters the trajectory of the inspection process, thus the data received from one machine might no longer be accurate when it is communicated to another machine.
For Saki, acc uracy starts with a machine gantry that has a frame with enhanced stiffness for accurate positioning and a closed-loop, dual servo-motor drive system with high-resolution linear scale. Saki’s proprietary hardware and software are combined in a stable system that produces position accuracy of 0.35 to 0.1 mil (9 to 3 μm), at three sigma.
Tests done using Saki’s 3D AOI system, showed that when coordinate positions were measured for deposition mark detection, after five hours of continuous operation, the process capability index (Cpk) for the x and y axes showed 1.8 and 2.7, respectively, indicating that a ±0.4 mil (±10 μm) accuracy was maintained for the area within the inspection window.
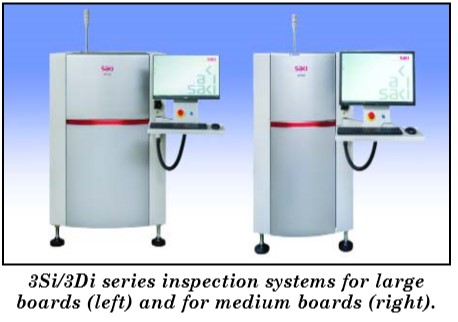
To accommodate diverse application needs and markets, today’s inspection and measurement systems need to encompass a broad spectrum of capabilities and configurations. They must be flexible enough to make on-the-fly adjustments to improve productivity, efficiency and shorten delivery time. Flexibility provides options and gives the manufacturer a path for growth and the ability to handle future needs. Saki’s AOI and SPI systems have platforms for different board sizes and configurations, handling PCBs in medium, large and extra-large sizes for large components, as well as incorporating dual lanes.
Using common hardware and software for both the SPI and AOI systems results in shorter delivery time and reduced training time, because it is only necessary to learn one common system for operation and maintenance. The company’s inspection systems even provide the flexibility to choose the resolution that best fits the application. Saki’s new 3D AOI series is the first to offer a choice of three resolutions — 0.27, 0.47 and 0.7 mil (7, 12 and 18 μm).
The Role of Hardware
Hardware plays a key role in productivity. According to Saki’s tests, its 3Di has the fastest speed in the industry for a 3D AOI system. A cycle time of approximately 15 seconds for mid-sized substrates was achieved by dramatically improving processing speed to 8.84 in.2/s (57 cm2/s) at 0.7 mil (18 μm) resolution. This is 1.9 times faster than previous 3D AOI models. In addition, Saki’s 3Si 3D SPI system has achieved speeds of up to 9.9 in.2/s (64 cm2/s) at 0.7 mil (18 μm) resolution.
Productivity per area increased by reducing the system’s footprint by 25 percent. Small footprint is a frequent requirement for manufacturers of products for the automotive and mobile equipment markets. Saki reconfigured its conveyor system so that substrates can be removed automatically during operation, eliminating the reject conveyor at the downstream end of the process. Capital investment efficiency has been improved, while a wider array of substrates can be supported, since the system conveys substrates up to 26.5 lb (12 kg).
Saki increased its inspection area size and the speed of area inspection by incorporating side cameras from four directions for high-speed automatic inspection. This accelerates the carrying in/out speed and shortens the time from temporary suspension to production restart. All improvements have been designed together for simultaneous improvement of productivity and accuracy. Nothing has been compromised.
A self-diagnostic, predictive and preventive maintenance management system ensures stable machine conditions and repeatable performance. Every key component is monitored along with system conditions and a detailed diagnostic log is recorded. This preventive maintenance plan reduces maintenance time, machine downtime, manpower, and costs.
The Role of Software
Saki’s inspection systems are built on inspection technology that scans the entire board and generates seamless 3D images. Those images are the foundation, but it is the software that is used to program the board, determine what data to collect, and translate that data into usable information that makes the images come alive. In other words, the software enables programming, inspection measurement and tuning, and verification. It is all about the data that is communicated to the other machines that enables true M2M functionality.
The company’s easy programming function was developed with three concepts in mind: board-less, skill-less and stress-less. The software saves a full 3D image of the whole PCB assembly, so the operator can create inspection data without using the physical board. Special BF2 software has a common user interface for all of the company’s 3D SPI, AOI and AXI systems.
A newly developed coplanarity inspection algorithm for Saki’s 3Si SPI system can be used to inspect the flatness of lower electrodes for components, such as BGAs, and parts that have narrower pitches and more pins. This prevents insufficient contact of the solder when mounting the parts.
The new algorithm inspects individual parts instead of using the conventional method of inspecting pads. It visualizes the distribution of the solder per substrate with a newly developed SPC function, which achieves improved process quality and traceability.
Three keys to Saki’s measurement and tuning function are its offline debugging, warpage adjustment and Fujiyama algorithm. The operator can edit inspection data to check previous good/bad images, or real-time defect images, offline, without any production interruptions. Warpage is compensated automatically, and an accurate height map is made of the entire PCBA surface, enabling an extra component detection function to detect foreign material.
The Fujiyama algorithm provides complete through-hole joint inspection in a single step. It simultaneously inspects for copper exposure, pin detection, pin-holes, solder fillets, and bridges. A history management system records the detailed data modification system in detail, and inspection accuracy is maintained by checking the machine status and inspection conditions before starting auto operation.
Applied Technology
 The demand for Industry 4.0, smart factory and M2M communications has fostered collaboration, cooperation and some confusion among companies in the industry, regarding standards, protocols and a drive to be part of the conversation. Equipment manufacturers have set their own requirements for industry partners, and standards and protocols vary by organization and region. Saki has embraced them all.
Saki’s BF-3Di 3D AOI systems were the first to be recognized by Panasonic with its APC-MFB certificate for true M2M communication. All 13 models of Saki’s fifth-generation 3Di system have also achieved this certification. Saki is a member of the ASYS PULSE Community and networks its automated inspection and measurement systems with electronic production equipment from other PULSE member companies.
Besides Panasonic, Saki is an integral part of the assembly process for manufacturers that include Fuji Machine Manufacturing and ASM. Saki is part of the Hermes Standard Initiative as well as the JARA-SMT equipment communication protocol standardization subcommittee, a Japanese manufacturing standard.
Saki’s new 3D AOI and 3D SPI systems meet or surpass all the requirements of these initiatives. The rigid structure of the hardware maintains a stable platform, so parameters are consistent and the data that is fed to the surrounding equipment is accurate. Proprietary software translates the data, so it is usable. The inspection system actually measures as it inspects.
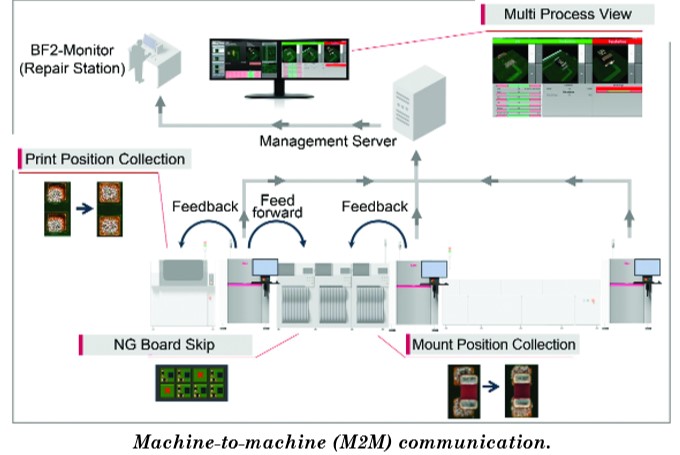
The data is communicated to the adjacent systems and can be used to make course corrections and evaluate the process in real time. Saki designs its systems to achieve an accuracy level that surpasses what is required for both printing machines and placement equipment.
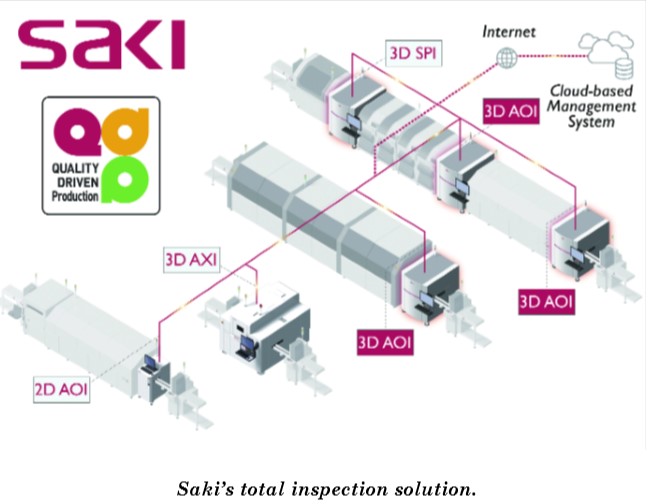
In conjunction with its 3D automated X-ray inspection (AXI) system, Saki both inspects and measures the entire assembly process, covering screen printing, dispensing, component placement, reflow, selective soldering, and conformal coating.
QDP is designed for the smart factory connection. Producing defect-free products using M2M communication requires maintaining absolute accuracy in inspection, data collection and data transfer in volume manufacturing environments.
Just as the company led the way with the development of automated recognition through robotic vision technology, the company’s new fifth-generation 3D automated inspection and measurement systems, which have advanced data capture, intuitive programming, imaging software capabilities, and M2M connectivity, are driving quality and production efficiency.
Source: March, 2018 issue of U.S. Tech ( http://www.us-tech.com/default.aspx?RelID=1931522&issearch=quality-driven%20production)
More information about the Saki machines


